When you deploy the OpenText™ Core Endpoint Protection to macOS, Apple mandates that the user grants OpenText™ Core Endpoint Protection Full Disk Access. Additionally, to perform network isolation on macOS devices running OpenText™ Core Endpoint Protection, Apple mandates that the user grants OpenText™ Core Endpoint Protection Network Filter permission. You can use Jamf to deploy a configuration file that completes these steps prior to the deployment of the OpenText™ Core Endpoint Protection.
Preparing for EDR/MDR
These instructions also include information to prepare macOS devices for installation of the EDR/MDR agent. These steps are marked with [EDR/MDR Preparation].
The following page explains what the user experience will be without preconfiguring the user’s machines:
How to give OpenText™ Core Endpoint Protection Full Disk Access on macOS
Deploying a Network Enabled Configuration Profile involves six steps:
When installing EDR/MDR, you will need to add the additional applications listed below for full disk access.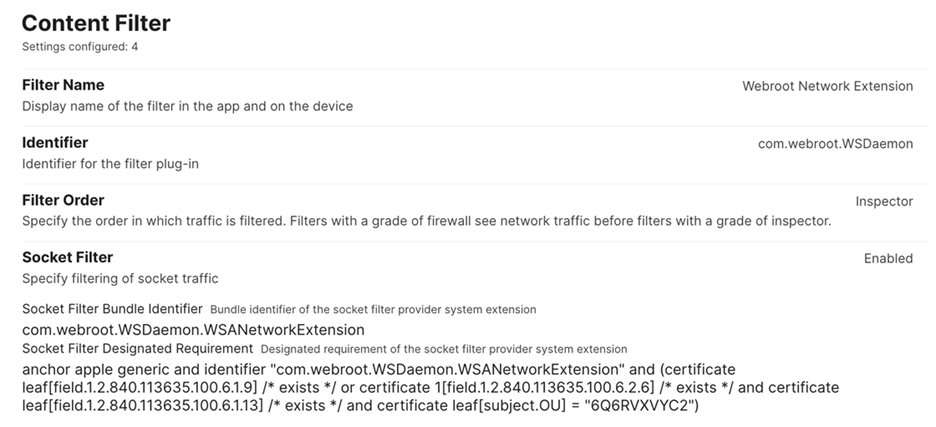
NOTE: Without this additional payload, users on macOS 15 and later would be able to manually remove the allowance for the operating system to manage the system extension.
The information in this article is offered as-is to assist customers. OpenText™ Core Endpoint Protection Support will not be able to answer questions on using Jamf to deploy a configuration profile. For additional resources, you can explore the Jamf Nation Community, and the OpenText™ Core Endpoint Protection Installation Guide.
If you are having problems using traditional methods to install the OpenText™ Core Endpoint Protection, please contact Support for assistance.
Preparing for EDR/MDR
These instructions also include information to prepare macOS devices for installation of the EDR/MDR agent. These steps are marked with [EDR/MDR Preparation].
The following page explains what the user experience will be without preconfiguring the user’s machines:
How to give OpenText™ Core Endpoint Protection Full Disk Access on macOS
Note: In some cases, the first time the user interface is opened, a prompt to approve FDA may still be shown even if it has been pre-configured. If this happens, it can be safely ignored as long as the System Preference’s “Security Privacy” panel shows that FDA has been granted to the OpenText™ Core Endpoint Protection app. You can also check that FDA has been successfully granted by verifying that any scan is in progress or has completed.
Deploying a Network Enabled Configuration Profile involves six steps:
- Create a Configuration Profile
- Configure Full Disk Access (FDA)
- Configure Content Filter
- Configure System Extensions
- Configure Second Payload for macOS 15 (Sequoia) and Later
- Deploy the Configuration Profile
Step 1: Create a Configuration Profile
- Log in to your Jamf Pro console.
- Navigate to: Computers > Configuration Profiles.
- Click the + New button to create a new configuration profile.
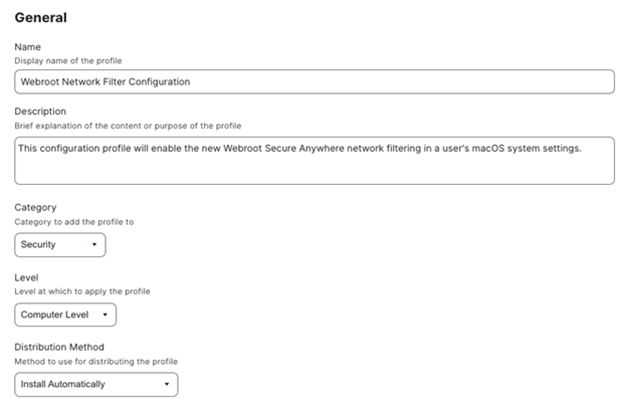
- In the General payload, provide the following:
- Display Name: Set to something like “OpenText™ Core Endpoint Protection Configuration”.
- Description: Briefly explain that this profile manages OpenText™ Core Endpoint Protection’s Full Disk Access and Network/System Extensions.
- Category: Choose an appropriate category (for example, Security).
- Level: Set to Computer Level.
- Distribution Method: Set the profile to Install Automatically (don’t forget to specify a scope of included endpoints or groups).
Step 2: Configure Full Disk Access (FDA)
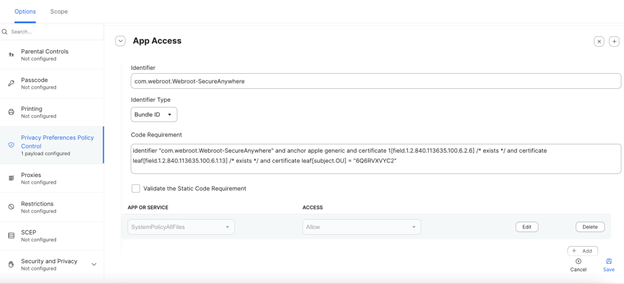
- In the left pane, click Privacy Preferences Policy Control (PPPC).
- Add the following settings:
- Bundle ID: com.webroot.Webroot-SecureAnywhere
- Code Requirement:
identifier "com.webroot.Webroot-SecureAnywhere" and anchor apple generic and certificate 1[field.1.2.840.113635.100.6.2.6] /* exists */ and certificate leaf[field.1.2.840.113635.100.6.1.13] /* exists */ and certificate leaf[subject.OU] = "6Q6RVXVYC2" - Set permissions for SystemPolicyAllFiles:
- Set Allow for Full Disk Access (FDA).
When installing EDR/MDR, you will need to add the additional applications listed below for full disk access.
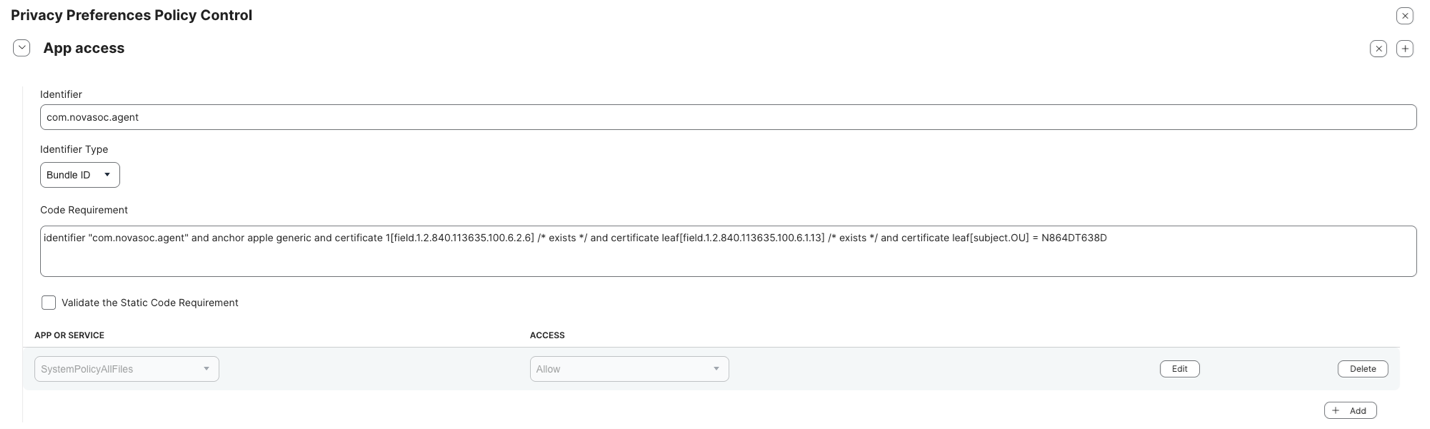
- [EDR/MDR Preparation] Add additional app access for novasoc.agent:
- Bundle ID: com.novasoc.agent
- Code Requirement:
identifier "com.novasoc.agent" and anchor apple generic and certificate 1[field.1.2.840.113635.100.6.2.6] /* exists */ and certificate leaf[field.1.2.840.113635.100.6.1.13] /* exists */ and certificate leaf[subject.OU] = N864DT638D - Set permissions for SystemPolicyAllFiles:
- Set Allow for Full Disk Access (FDA).
- Set Allow for Full Disk Access (FDA).
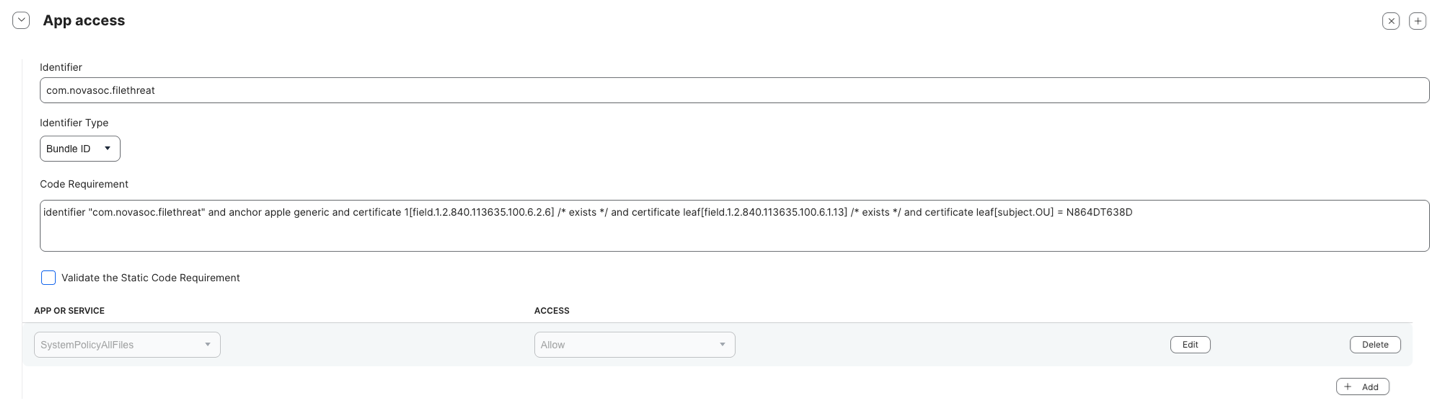
- [EDR/MDR Preparation] Add additional app access for novasoc.filethreat
- Bundle ID: com.novasoc.filethreat
- Code Requirement:
identifier "com.novasoc.filethreat" and anchor apple generic and certificate 1[field.1.2.840.113635.100.6.2.6] /* exists */ and certificate leaf[field.1.2.840.113635.100.6.1.13] /* exists */ and certificate leaf[subject.OU] = N864DT638D - Set permissions for SystemPolicyAllFiles:
- Set Allow for Full Disk Access (FDA).
- Set Allow for Full Disk Access (FDA).
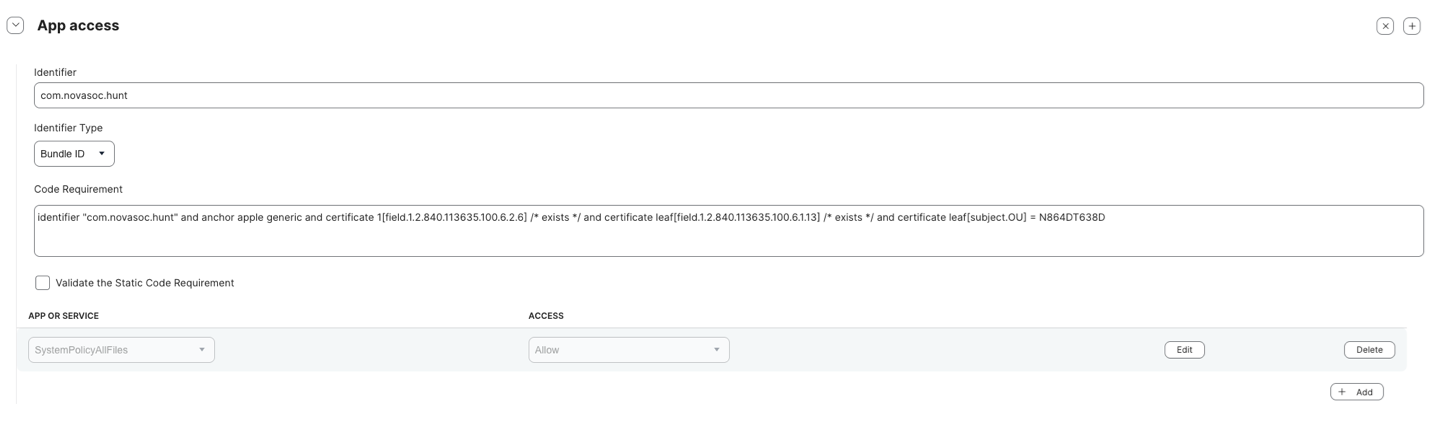
- [EDR/MDR Preparation] Add additional app access for novasoc.hunt
- Bundle ID: com.novasoc.hunt
- Code Requirement:
identifier "com.novasoc.hunt" and anchor apple generic and certificate 1[field.1.2.840.113635.100.6.2.6] /* exists */ and certificate leaf[field.1.2.840.113635.100.6.1.13] /* exists */ and certificate leaf[subject.OU] = N864DT638D - Set permissions for SystemPolicyAllFiles:
- Set Allow for Full Disk Access (FDA).
- Set Allow for Full Disk Access (FDA).
- [EDR/MDR Preparation] Add additional app access novasoc endpoint
- Bundle ID: com.novasoc.endpoint
- Code Requirement:
identifier "com.novasoc.endpoint" and anchor apple generic and certificate 1[field.1.2.840.113635.100.6.2.6] /* exists */ and certificate leaf[field.1.2.840.113635.100.6.1.13] /* exists */ and certificate leaf[subject.OU] = N864DT638D - Set permissions for SystemPolicyAllFiles:
- Set Allow for Full Disk Access (FDA).
Step 3: Configure Content Filter
- In the left pane, click Content Filter, then click Configure.
- Set the following:
- Filter Name: This must be named to match what the agent would name it when installing interactively so that it does not try to install it again. The name to use is: OpenText™ Core Endpoint Protection
- Identifier: This must match the identifier for the filter plug-in: com.webroot.Webroot-SecureAnywhere
- Filter Order: Set to Inspector.
- Enable the Socket Filter option:
- Socket Filter Bundle Identifier:
com.webroot.WSDaemon.WSANetworkExtension - Socket Filter Designated Requirement:
anchor apple generic and identifier "com.webroot.WSDaemon.WSANetworkExtension" and (certificate leaf[field.1.2.840.113635.100.6.1.9] /* exists */ or certificate 1[field.1.2.840.113635.100.6.2.6] /* exists */ and certificate leaf[field.1.2.840.113635.100.6.1.13] /* exists */ and certificate leaf[subject.OU] = "6Q6RVXVYC2")[A screenshot of a computer Description automatically generated]
- Socket Filter Bundle Identifier:
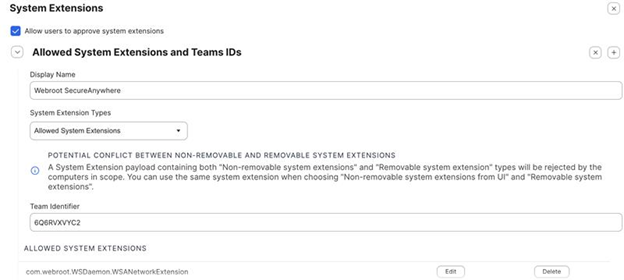
Step 4: Configure System Extensions
- In the left pane, click System Extensions, then click Configure.
- Set the following:
- Display Name: Set to “OpenText™ Core Endpoint Protection”
- Team Identifier: 6Q6RVXVYC2
- Allowed System Extensions: com.webroot.WSDaemon.WSANetworkExtension
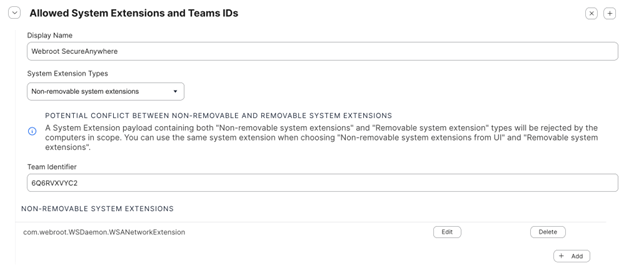
Step 5: Configure Second Payload for macOS 15 (Sequoia) and Later
NOTE: Without this additional payload, users on macOS 15 and later would be able to manually remove the allowance for the operating system to manage the system extension.- In the left pane, click System Extensions, then click Configure.
- Set the following:
- Display Name: Set to “OpenText™ Core Endpoint Protection”
- Team Identifier: 6Q6RVXVYC2
- Non-removable system extensions:
com.webroot.WSDaemon.WSANetworkExtension
Step 6: Deploy the Configuration Profile
- Save the profile.
- Ensure the scope includes all relevant devices.
- Deploy the profile to the endpoints.
The information in this article is offered as-is to assist customers. OpenText™ Core Endpoint Protection Support will not be able to answer questions on using Jamf to deploy a configuration profile. For additional resources, you can explore the Jamf Nation Community, and the OpenText™ Core Endpoint Protection Installation Guide.
If you are having problems using traditional methods to install the OpenText™ Core Endpoint Protection, please contact Support for assistance.
Thanks for your feedback!
Powered by NOHOLD Inc. U.S. Patent No. 10,659,398
All Contents Copyright© 2025